The following healthcare information is intended as an information resource only and should not be used as a substitute for professional diagnosis and treatment.
 |
Hitchhiker Level 1 (thumb) Lie on your back with your feet rested flat on the floor (knees bent). Have your arms lying straight next to your torso. Your thumbs point upwards in this initial position. Keep your arms straight as you raise your fists towards the ceiling and back down over your head, towards the floor. Keep your core engaged (no arching of low back). One of the objectives of this is being able to get your thumbs to touch the floor without bending your arms and without shrugging your shoulders. Don’t let the shoulder blades leave the mat. Return to the starting position and repeat. |
 |
Hitchhiker Level 1 (fist) Lie on your back with your feet rested flat on the floor (knees bent). Have your arms lying straight next to your torso. Your fingers enclose your thumbs throughout the movement. Keep your arms straight as you raise your fists towards the ceiling and back down over your head, towards the floor. Keep your core engaged (no arching of low back). One of the objectives of this is being able to get your fists to touch the floor without bending your arms and without shrugging your shoulders. Don’t let the shoulder blades leave the mat. Return to the starting position and repeat. |

|
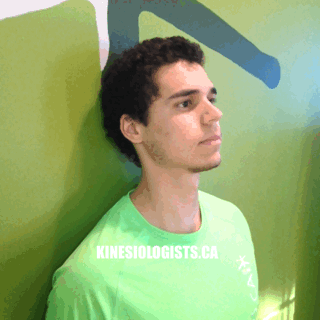
Standing Hitchhikers Level 2 (thumb) Stand so that your heels, bum, and upper back are in contact with the wall behind you. Have your arms hanging straight down next to your torso. Your thumbs point forwards in this initial position. Keep your arms straight as you raise your fists towards the ceiling and over your head, towards the wall behind you. Keep your core engaged (no arching of low back). One of the objectives of this is being able to get your thumbs to touch the wall without bending your arms and without shrugging your shoulders. Don’t let the shoulder blades leave the wall. Return to the starting position and repeat. |
 |
Standing Hitchhikers Level 2 (fist) Stand so that your heels, bum, and upper back are in contact with the wall behind you. Have your arms hanging straight down next to your torso. Your fingers enclose your thumb to make a fist throughout the movement. Keep your arms straight as you raise your fists towards the ceiling and over your head, towards the wall behind you. Keep your core engaged (no arching of low back). One of the objectives of this is being able to get your thumbs to touch the wall without bending your arms and without shrugging your shoulders. Don’t let the shoulder blades leave the wall. Return to the starting position and repeat. |
 |
Floor Angels Lie on your back with your feet rested flat on the floor (knees bent). Have your arms resting so that your elbows and knuckles are resting on the floor (palms facing up). Keeping your core engaged, slide your arms up so that they glide towards your head. This is to mimic over-head movement. Try to think of gliding the arms up while pulling the shoulders down so that we avoid shrugging. Once at the top, glide your arms back down so that you feel a squeezing/cramping sensation in your lats and mid back. It is important to keep your elbows and knuckles touching the floor throughout these movements. |
 |
Wall Angels Stand so that your heels, bum, and upper back are in contact with the wall behind you. Have your arms resting so that your elbows and knuckles are pressing against the wall (palms facing forward). Keeping your core engaged, slide your arms upwards. Try to think of gliding the arms up while pulling the shoulders down so that we avoid shrugging. Once at the top, glide your arms back down so that you feel a squeezing/cramping sensation in your lats and mid back. The angle between your bicep and forearm should decrease as you do this. Prevent the low back from arching excessively when doing this movement by engaging the core and tucking the pelvis forward if necessary. Note: if this is too difficult, regress to not having your heels against the wall and assume a more “1/4 squat-like” position before continuing as described. |
 |
Martinis Stand facing the wall. The pinky side of the hands and forearms should all be in contact with the wall. The starting position should look like a “V” where your elbows are closer to your midline than your hands. Exhale as you glide the hands upwards into a wider “V.” The forearms and elbows should never leave the wall as you gently press forward and up. Keep your core engaged during the exercise. Pull the shoulders down towards your feet as you glide the arms up. |
 |
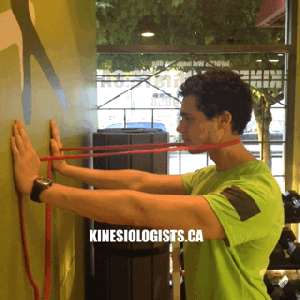
Standing High Elbow Rows (with Band) Have your palms facing downward as you grip the cable. Exhale as you pull the band towards your body. Your weight should be evenly distributed across the soles of both feet. At the end of the pulling phase, the band should be somewhere between your chest height and chin height. (This will depend on what your trainer has instructed based on your level). As you do this exercise, imagine squeezing a pen between your shoulder blades. |
 |
Reverse Flyes / Band Crosses (with Band) Imagine pulling the band apart as you squeeze your shoulder blades together. There should be a slight bend in the elbows when doing this. Exhale as you pull the band apart. Stop pulling back once your arms are parallel with your torso. |

|
Seated Lat Pulldown (Machine) Hinge backwards from the hips slightly as you grip the bar where the bar bends. Engage your core. There should be no hyperextension in the low back. Exhale as you pull the bar down past chin level to the mid part of your chest. Your wrists should never be below your elbows during this exercise. Keep the shoulders back and down throughout the movement; especially on the way up where the majority of individuals shrug excessively. |
 |
Seated Rows (with Band or Cable) Have your palms facing each other as you grip the handles. Sit straight and tall: imagine a rope is attached to the top of your head and is pulling you towards the ceiling. Sit on your hip bones (not tail bone). Keep the shoulders back and down throughout the movement. Exhale as you pull. Pull your elbows to just past your torso. Keep the core engaged at all times. Imagine pulling to your belly button. |
 |
Quarter Squat Rows (with Band or Cable) Have your palms facing each other as you grip the handles. Stand straight and tall: imagine a rope is attached to the top of your head and is pulling you towards the ceiling. Keep the shoulders back and down throughout the movement. Exhale as you pull. Pull your elbows to just past your torso. Keep the core engaged at all times. Imagine pulling the band to your belly button. |
 |
Wall Slide with Foam Roller Stand facing the wall, with your toes about 30cm away from it. Pin the foam roller between the wall and the pinky side of both hands (like a Karate chop). The angle between your elbows and forearms should be less than 90 degrees. As you inhale, glide your arms upwards as the foam roller moves up the wall. Keep your shoulders pulled back and down during the movement. Move as high as you can without shrugging. Keep you core engaged. Pause at the top of the movement. Exhale as you press the foam roller into the wall harder and pull it down towards your toes back to the position you started in. Keep the head back and chin tucked in throughout. |
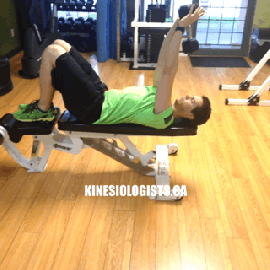 |
Supine pullovers Lie on your back, with your feet propped up on the bench. You are holding the dumbbell over your head using a triangle hold position with your hands. Bring the dumbbell back over your head until the arms are parallel to the floor. If you cannot go that far back, your trainer will accommodate you with more specific instructions. Keep the arms straight at all times. Exhale as you return to the starting position. Keep the shoulders pulled down towards the torso during the movement. Do not let your lower back leave the support of the bench. |
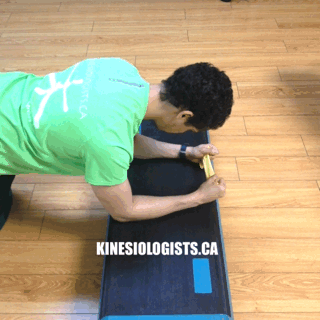 |
4 point external rotation Avoid rounding in this position by pulling shoulders back and down, sticking the chest out, tucking the chin in, and pulling the head away from the bum. Place your elbows and forearms on the supporting structure in a position where your elbows are wider apart than your hands. Exhale as you pull the wrists apart, keeping the elbows and forearms in contact with the supporting structure at all times. Return to the starting position and repeat for the desired rep count. |
 |
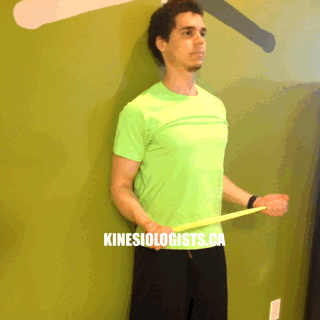
Standing external rotation (facing wall) Place your elbows and forearms on the wall in a position where your elbows are a bit wider apart than your hands. Your toes should be about 30 cm away from the wall. Core engaged. Exhale as you pull the wrists apart, keeping the elbows and forearms in contact with the supporting structure at all times. Return to the starting position and repeat for the desired rep count. |
 |
Standing external rotation (away from wall) Stand with your heels, bum, upper back, and the back of your head touching the wall. Have your arms in a position so that the angle between your forearms and biceps is roughly 90 degrees. Have your palms facing upwards. Exhale as you pull the wrists away from each other as you try to get your thumbs as close to the wall behind you as possible. A resistance band may be added depending on the degree of existing difficulty. You should feel your shoulder blades squeezing together and back into the wall as you do this. |
 |
Standing external rotation (away from wall with neck rotation) Stand with your heels, bum, upper back, and the back of your head touching the wall. Have your arms in a position so that the angle between your forearms and biceps is roughly 90 degrees. Have your palms facing upwards. Exhale as you pull the wrists away from each other as you try to get your thumbs as close to the wall behind you as possible. A resistance band may be added depending on the degree of existing difficulty. You should feel your shoulder blades squeezing together and back into the wall as you do this. |
 |
Standing chin tucks Stand with your heels, bum, and upper back touching the wall. Keep your core engaged (depending on what your kinesiologist has instructed, you might have to tuck in your pelvis). Tuck your chin in so that it is parallel to the floor. Pull your head back towards the wall. At the same time, pull the head upwards. Imagine pulling your head back to the wall as a rope is pulling your head up; lengthening your spine. You should feel this at the front of the neck, and a lengthening opening feeling anywhere from your mid back up to the neck. Return back to starting position unless instructed by your kinesiologist. Repeat. |
 |
Standing chin tucks with band resistance Face the wall with the palms of your hand flat. Have your arms straight. You are holding an elastic cable in this position, with a part of the band looped around the back of your neck. You want grasp the cable so that an appropriate amount of resistance is felt pulling on the neck. Pull your head back in the opposite direction of the cable pulling you. Keep your chin tucked in as you do this. Imagine a rope is pulling your head away from the feet as you do this as well. |
 |
Supine shoulder retractions Lie face up on a foam roller. Your tailbone and the back of your head should be comfortably supported before beginning this exercise. Raise the arms so that they are perpendicular to the floor; fingers pointing straight up. Imagine reaching up to touch the ceiling (you should feel your shoulder blades leaving the foam roll) Then, pull your shoulder blades back down towards the foam roller. Imagine making the shoulder blades hug the foam roller as you do this. As you pull into retraction, avoid shrugging. Ultimately the movement should consist of hugging the foam roller with your shoulder blades, and pulling your shoulders away from your ears simultaneously. Keep the arms straight throughout this movement. Note: if you do not have a full foam roller, this may be done on the floor. |
 |
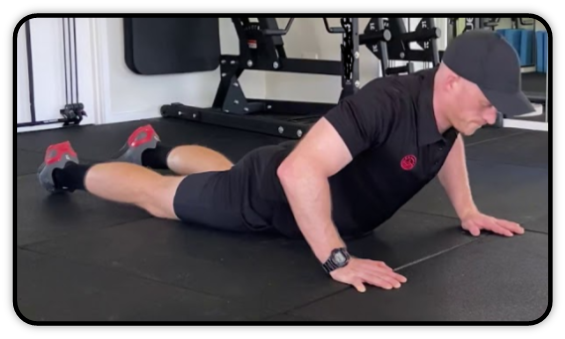
Active Sphinx Lie face down on a mat. Have your pelvis, abdominals, chest, and arms all resting on the floor. Your thumbs should be in line with your eyebrows, and palms down. Tuck your pelvis in before commencing the exercise. Keeping your core engaged, you are going to raise your head off the floor whilst keeping your chest in contact with the ground. Imagine pulling your head away from your feet as you do this to “lengthen” the spine. Keep the chin tucked in throughout this exercise. You should feel this anywhere in the mid back and up into the neck. This is not supposed to be a wide range of motion. Lower your self back down to the beginning and repeat. You should not feel this in your low back at any point in time. If you are cease the exercise, and consult with your Kinesiologist before continuing. |
 |
Passive cobra Lie face down on a mat. Have your pelvis, abdominals, chest, and arms all resting on the floor. Your thumbs should be in line with your eyebrows, and palms down. Tuck your pelvis in before commencing the exercise. You are going to raise your head off the ground (see Active sphinx). Once at the top of the movement, glide your arms to the side of your torso. All your body weight should now be supported by your arms. Hold this position for the time requested by your Kinesiologist. Imagine pulling your head away from your toes and keep the chin tucked in a neutral position as you do this. |
| PIC | TEXT |
